Environment Manager
Ivanti Endpoint Manager 2018.1 added Ivanti Environment Manager support. Environment Manager is an Ivanti product that is licensed and sold separately. Environment Manager provides on-demand personalization of user desktops and helps protect endpoints with fine-grained contextual policy control.
Environment Manager Personalization ensures:
- Fast logon times.
- A fully personalized desktop experience, regardless of location or device.
- A secure desktop environment that adapts based on user context.
Use Environment Manager Policy to:
- Enforce policy real-time throughout the user session, not just at login.
- Help meet corporate and industry-based compliance mandates such as HIPAA, FINRA, and PCI.
- Run multiple policies in parallel for the best possible user experience.
If you want to see a video summarizing the Environment Manager configuration process, click the link below.
Configuring Environment Manager
Endpoint Manager setup also installs Environment Manager. Before you can use Environment Manager, you must configure it. There are three main configuration steps:
You need to deploy the Environment Manager agent before you can manage devices with Environment Manager.
You can skip this step if Environment Manager is already deployed in your environment.
To deploy the Environment Manager agent
- Click Tools > Configuration > Agent Configuration, and double-click the Windows agent configuration that you use.
- On the Start page, select the Environment Manager Policy option.
- Deploy the agent configuration to managed devices.
The Environment Manager agent looks for a license file on each managed device. When you purchase Environment Manager, Ivanti gives you a license file. If the Environment Manager agent doesn't detect a valid license file, it won't operate.
You can skip this step if the Environment Manager license file is already deployed in your environment.
To deploy the Environment Manager license file
- Copy your Environment Manager license file to this folder on your core server: C:\Program Files\LANDesk\ManagementSuite\LANDesk\files
- Click Tools > Distribution Packages > Public Packages.
- In the list, double-click Environment Manager License Deployment to open its properties.
- On the Additional Files page, from http:///landesk/files/, move your license file from the Available files list to the Additional files list.
- Click Save.
- Deploy the Environment Manager License Deployment package with a policy-supported push.
The Environment Manager console uses core server credentials and a unique "secret" key to connect to a core server.
To obtain the core server secret key (2022 SU4 and newer)
- Click Configure > Services, then click the Identity Server Secrets tab.
- Click the Load Secrets (Optional) button at the bottom.
- Next to Environment Manager, click the Copy to Clipboard button.
To obtain the core server secret key (2022 SU3 and older)
- On your core server, open this file with a text editor: C:\ProgramData\LANDesk\ServiceDesk\My.IdentityServer\IdentityServer3.Core.Models.Client.json
- In that file is a section like the one below: JcfZCcxemugWVIYr5upu","Description":"EMClient Secret","Type":"SharedSecret","Expiration":null> The 20-character random alphanumeric value before "EMClient Secret" is the string you need. It's bolded in this example. To help you find it, you may want to search to do a text search for "EMClient Secret".
To connect Environment Manager to a core server
- Click Tools > Configuration > Environment Manager Policy. The Environment Manager console opens in a separate window.
- Click File > Open > Configuration from Endpoint Manager.
- Click the Add toolbar button
 .
.
- In the Add Endpoint Manager Server dialog box, enter your core Server name, a Friendly name that helps you identify your server in the server list, and the Secret string you found earlier.
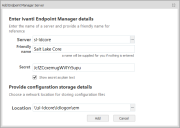
- Set the Location to \\\ldlogon\em. If the "em" folder doesn't exist, click the browse button next to the Location box and click New folder so you can create it. If you want to use a different folder under \ldlogon, modify the path you provide to match.
- Click Add. Your core configuration will appear in the Configurations list.
Using Environment Manager
Once you've created a configuration for your core server in Environment Manager, you can create new policies or edit existing policies. Environment Manager policies are saved to the core as public software distribution packages with the name and description you specify. Use Endpoint Manager software distribution to deploy the policies you create.
- Click Tools > Configuration > Environment Manager Policy. The Environment Manager console opens in a separate window.
- Configure your new policy in Environment Manager.
- Click File > Save As > Configuration in Endpoint Manager.
- Select an Endpoint Manager core server configuration from the list and click Connect. Provide core server credentials if necessary.
- Enter a Configuration name and Description. These items become the software distribution package name and description in Endpoint Manager .
- Click Save. The policy will be saved to the core server you selected.
- Click Tools > Configuration > Environment Manager Policy. The Environment Manager console opens in a separate window.
- In the Environment Manager window, click File > Open > Configuration from Endpoint Manager.
- Select an Endpoint Manager core server configuration from the list and click Connect. Provide core server credentials if necessary.
- Environment Manager will show the list of policies on your core server. Select the policy you want and click Open.
- Make your policy modifications.
- Click File > Save As > Configuration in Endpoint Manager.
- Select a Endpoint Manager core server configuration from the list and click Connect. Provide core server credentials if necessary.
- Enter a Configuration name and Description. These items become the software distribution package name and description in Endpoint Manager .
- Click Save. The policy will be saved to the core server you selected.
Was this article useful?
